We all have that one t-shirt tucked away, full of memories but no longer worn. If you’ve ever found yourself wondering what to do with old sentimental t-shirts, why not upcycle them into something new and meaningful? Here are 10 creative ideas to help you turn those cherished pieces into stylish keepsakes.
Idea #1. Make Blankets, Quilts and Pillow-Cases
These are a great go-to for those forgotten pieces and add a little bit of extra warmth to snuggle up to in the winter. These can also make really nice mementos if you have any old football jersey shirts or collected band t-shirts lying around.
The basic process is to cut your t-shirts into squares, stitch them together, and to add a lining to make it a bit thicker and neater. Here are some steps to get you started:
Step 1: Choose the T-Shirts for Your Blanket or Quilt
Start by selecting the t-shirts you’d like to use for your project. Aim for about 16-30 t-shirts for a blanket that is 4-5 squares wide and long. Choose shirts with sentimental value, like old football jerseys or band tees, to make the project more meaningful.
Step 2: Cut the T-Shirts into Squares
For consistency, measure and cut each t-shirt’s middle section into squares. A good size is 12 inches by 12 inches, but feel free to adjust according to your t-shirt’s size and your personal preferences.
Step 3: Iron the T-Shirts
Iron each t-shirt to give it a neat, professional look. For added durability, you can also use fusible bonding webs to interface the fabric. This technique adheres two fabrics together without sewing and adds extra protection to your blanket.
Step 4: Arrange the Squares
Lay out the t-shirt squares in the pattern you’d like. If you have 16 squares, arrange them in a 4×4 grid. Play around with the design to find the best look before you start sewing!
Step 5: Pin and Sew the T-Shirt Squares Together
Pin the squares in place, then sew them together. You can sew by hand or use a sewing machine — whichever is most comfortable for you. Be sure to sew carefully to ensure the squares stay aligned.
Step 6: Add Batting for Extra Warmth
If you want to make your blanket extra cozy, consider adding batting, a soft layer of padding between the fabric. This step will make your quilt or blanket thicker and warmer, perfect for those chilly nights.
Step 7: Embellish Your Creation
Add some personal touches with embellishments like a border, sequins, or additional sewing details. Embellishing your blanket or quilt can make the colors from your t-shirts pop and tie the squares together for a unified look.
PRO Tip: Start small by making a pillowcase first to practice the process and get comfortable with sewing your sentimental t-shirts before committing to a larger project like a blanket or quilt.
Idea #2. Cut, Tear, and Sew Your T-shirt
Sometimes, the smallest tweaks can turn an old, forgotten shirt into a standout statement piece. You don’t need a sewing machine — many creative no sew upcycling projects start with simple hand-stitching or even a hot glue gun. Here are a few beginner-friendly methods to get started.
What You’ll Need:
- Fabric scissors
- Needle and thread (or fabric glue for no-sew methods)
- Tape measure
- Chalk or fabric marker
- Pins
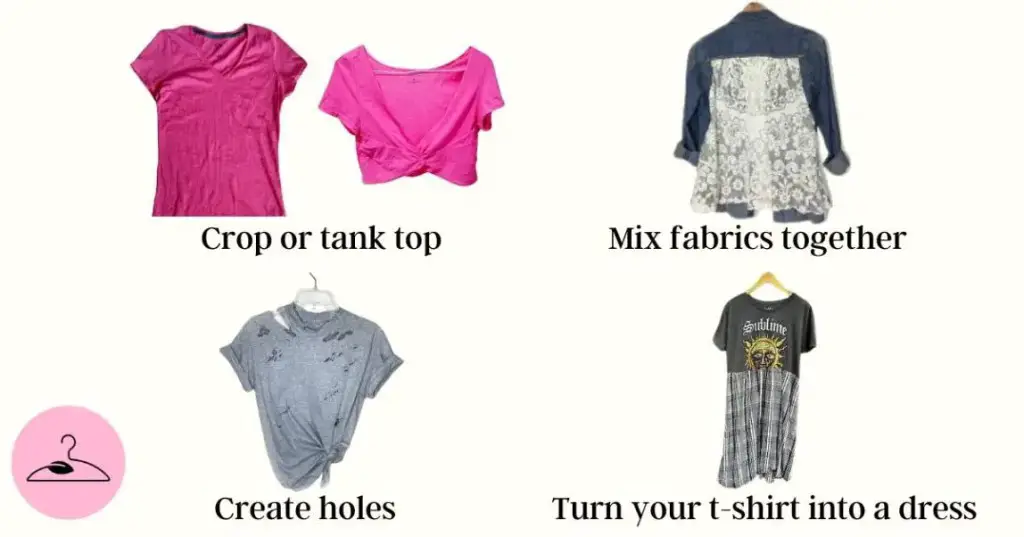
Crop or Tank Top
If your t-shirt is stretched out or oversized, consider cropping it into a trendy crop top or removing the sleeves to turn it into a tank top. This is a simple yet effective way to breathe new life into a tired t-shirt.
Create Holes for a Layered Look
Slash holes or make cuts in your t-shirt to create a distressed, edgy look. These cuts can be used to layer the top over another shirt for a layered style or tied at the bottom for a more fitted look.
PRO Tip: Start with a simple cut or crop and work your way up to more advanced techniques once you’re comfortable with the process.
Mix Fabrics Together
Experiment with mixing fabrics like denim and lace to add texture and depth to your t-shirt creations. Stitch (or glue) panels onto your tee to create a hybrid, one-of-a-kind look.
Turn Your T-Shirt into a Dress
Transform your t-shirt into a completely new item, like a tunic or dress. Here’s how:
- Cut your t-shirt at the rib cage.
- Attach it to a different piece of fabric of your choice.
- Sew along where the two fabrics meet. For a cleaner look, fold over the bottom of the fabric before sewing.
- For a more flattering fit, make the skirt part of the dress wider and then gather it in at the waist.
PRO Tip: Adding a belt or some embellishments can take this look even further.

Idea #3. Tie-Dye: Add a Psychedelic Touch
Tie-dye is a fun and nostalgic way to repurpose a t-shirt. It brings a touch of color and creativity to your wardrobe, while also reminding us of the simple perks of upcycling — like reducing waste and turning something old into something entirely new.
What You’ll Need:
- String or rubber bands
- Spray bottle
- Rubber gloves
- Dye or bleach
- Water
How to Do It:
- Fold and Crumple: Fold and crumple your t-shirt in various directions so the dye hits different parts of the shirt.
- Secure with String or Rubber Bands: Tie the t-shirt tightly with string or rubber bands to keep the fabric in place.
- Apply Dye or Bleach: Spray or dip the t-shirt in dye. If your shirt is dark, you can use diluted bleach instead for a cool effect.
- Spray Evenly: Add dye or bleach into a spray bottle, and spray the t-shirt, turning it around to cover both sides evenly.
- Dry and Reveal: Let your t-shirt dry in the sun. Unravel it and check the pattern. Add more dye or bleach if you’d like a bolder effect.
⚠️ Caution: If you’re underage, make sure to do this with an adult since some products can be dangerous if mishandled.
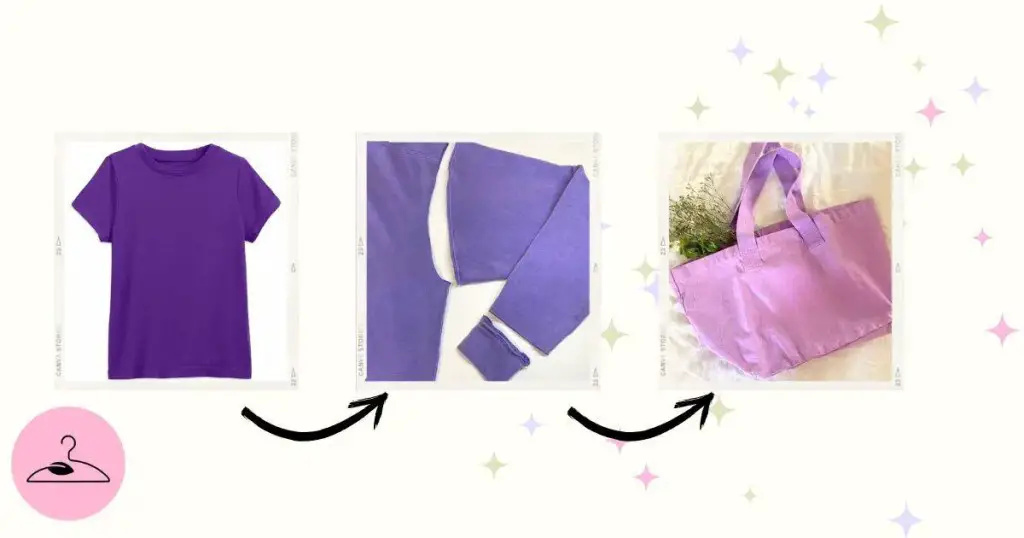
Idea #4. Turn Your T-shirt Into a Tote Bag
Perfect for a rainy day project or just something fun and useful to do at home, turning an old sentimental T-shirt into a tote bag is both practical and eco-friendly. This way, you give your old tee a new life and reduce your use of plastic bags at the same time. Here’s how you can do it:
Step 1: Prep the T-Shirt
Start by ironing your T-shirt to remove any wrinkles. Lay it flat on a work surface, then fold it in half vertically. Make sure the edges and sleeves are aligned evenly.
Step 2: Cut Sleeves and Neckline
Cut off the sleeves and the neckline. Try to keep the cuts neat and even on both the front and back. The neckline will become the opening of your bag, so make sure it’s wide enough to fit items inside — but not so wide that they might fall out. The shoulder area will serve as the handles of the tote.
Step 3: Add Optional Fringe
If you’d like to personalize your bag, you can cut vertical strips around the opening or bottom to create a fringe detail. These strips can also be tied or left hanging for a decorative touch.
Step 4: Prepare the Bottom of the Bag
To close the bottom, cut a row of small rectangular strips along the hem—about 1 inch wide and 2 inches long. Make sure you’re cutting through both the front and back layers of the shirt.
Step 5: Add Side Slits and Turn Inside Out
At each end of the bottom hem, cut a small slit in the last rectangle to make tying easier. Then, turn the shirt inside out.
Step 6: Tie the Bottom Closed
Tie each pair of front and back fabric strips together into tight knots. To close any gaps between the knots, tie neighboring strips diagonally across the opening. This helps create a secure and seamless bottom. Make sure every strip is double-knotted for extra strength.
Step 7: Flip and Enjoy!
Once you’re done tying, flip the bag right side out. You now have a unique, handmade tote bag!
PRO Tips:
- 💡 Want it even more compact? Some tutorials show how to fold this tote into a small drawstring pouch — great for storage or travel.
- 🎥 Prefer to follow along visually? Search YouTube for step-by-step tutorials. There are some creative ideas out there, like tie-dyeing the T-shirt first for extra flair.
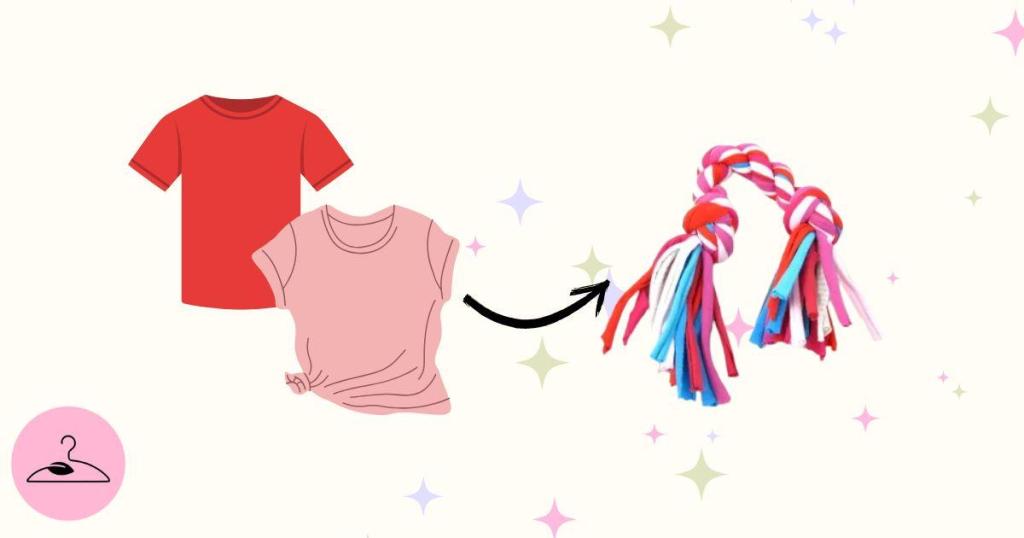
Idea #5. Turn Your T-Shirt Into a Dog Toy
Have a few t-shirts lying around that you don’t mind parting with? If they’re not too sentimental, why not give them a second life as a fun toy for your furry friend?
Here’s how to do it:
- Cut it up – Start by slicing your t-shirt into long strips. The more strips you have, the sturdier the toy will be.
- Tie it together – Take three or more strips and tie them together at one end with a secure knot.
- Braid away – Braid the fabric tightly, just like you would hair. For extra strength, use strips from multiple t-shirts for a thicker, more durable tug toy.
- Secure the end – Once braided, finish it off with another strong knot at the other end. Tug gently to make sure everything holds.
No need to be precise — dogs love it rough and rugged. Plus, it’s washable, eco-friendly, and way more fun than tossing another t-shirt in the trash.
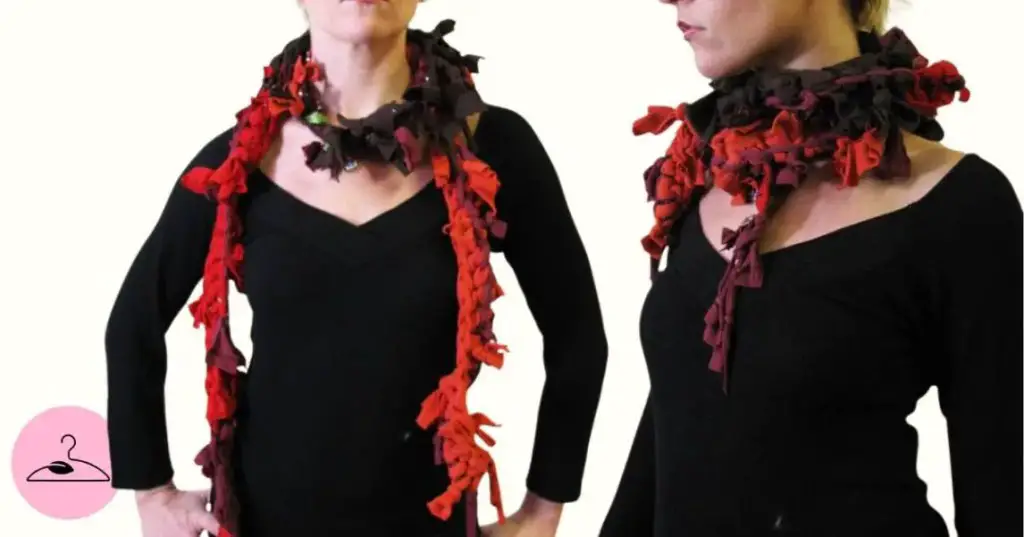
Idea #6. Crochet a Scarf
If you enjoy knitting, sewing, or crochet, this one’s for you. Cut up pieces from old t-shirts or other garments you love, then stitch or crochet them together into a cozy, mismatched scarf. The mix of colors and fabrics gives it a unique, handmade feel.
Add tassels, beads, or embroidery at the ends for a final creative touch. It’s a fun way to upcycle and keep your favorite fabrics close: just in a new form.
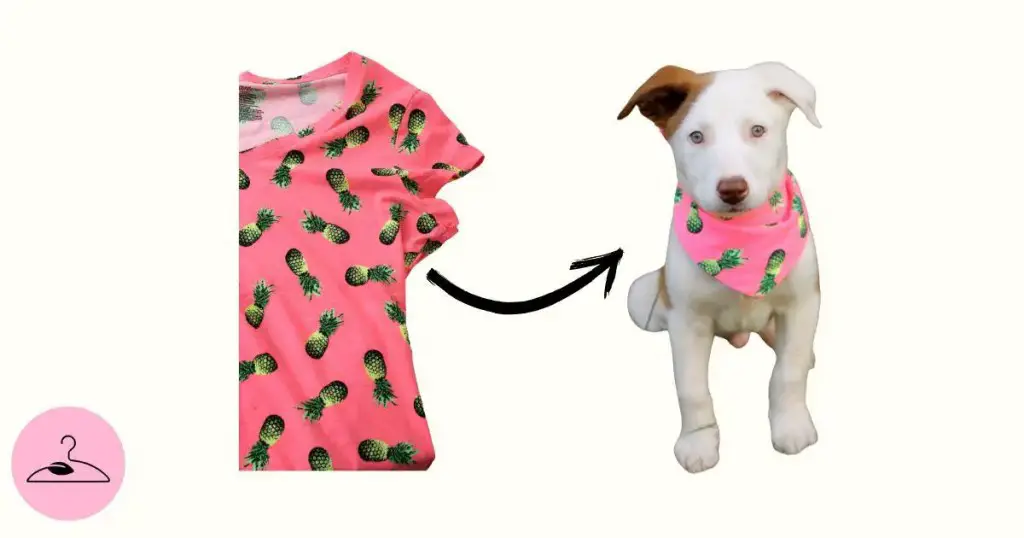
Idea #7. Make a DIY Dog Bandana
Turn an old t-shirt into a charming bandana for your pup! It’s a quick, beginner-friendly project that adds a touch of personality to your pet’s look — and makes a thoughtful handmade gift too.
🧵 What You’ll Need:
- An old t-shirt
- Fabric scissors
- Optional: themed fabric (e.g. paw prints, birthday patterns)
✂️ How to Make It:
- Cut one piece of t-shirt fabric into a triangle.
- Add any extra fabric for fun patterns or special occasions.
- Gently tie it around your dog’s neck— comfy, not tight.
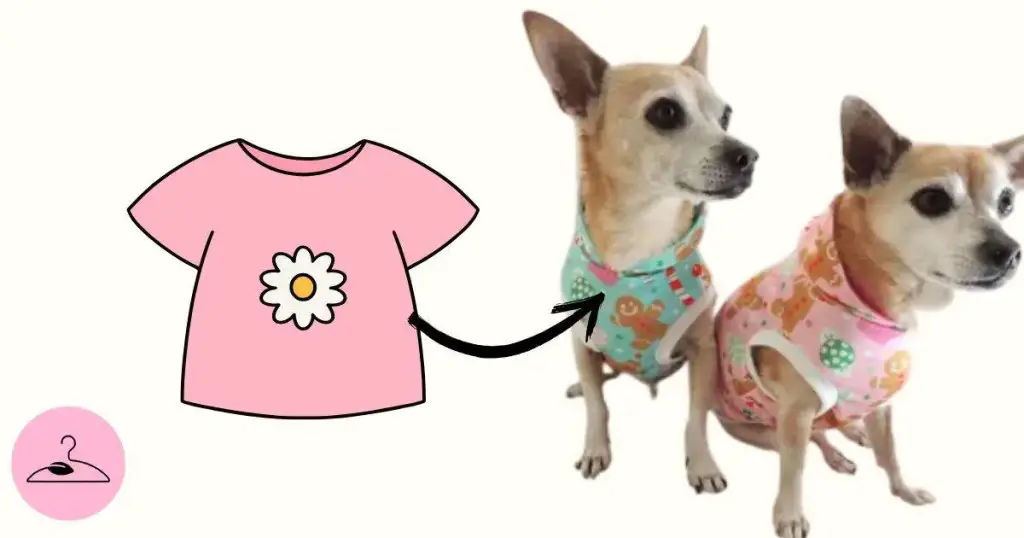
Idea #8. Make a Smaller T-Shirt for Your Dog or Cat
Give your pet some comfy style by turning an old t-shirt into a cozy custom fit! For the dog shirt, follow these steps:
📏Measure First:
Measure your dog’s back from neck to tail and add about 2 cm for seam allowance and comfort.
✂️Cut the Fabric:
Lay the t-shirt flat. Cut from the front center, just below the neckline. You can pin the fabric in place to avoid slipping.
🧩Shape the Fit:
Cut lengthwise to match your dog’s stomach length. Then match the front and back sides of the fabric.
🪡Sew it Up:
Stitch the pieces together along the sides, but leave the neckline open so it easily slips over your dog’s head.
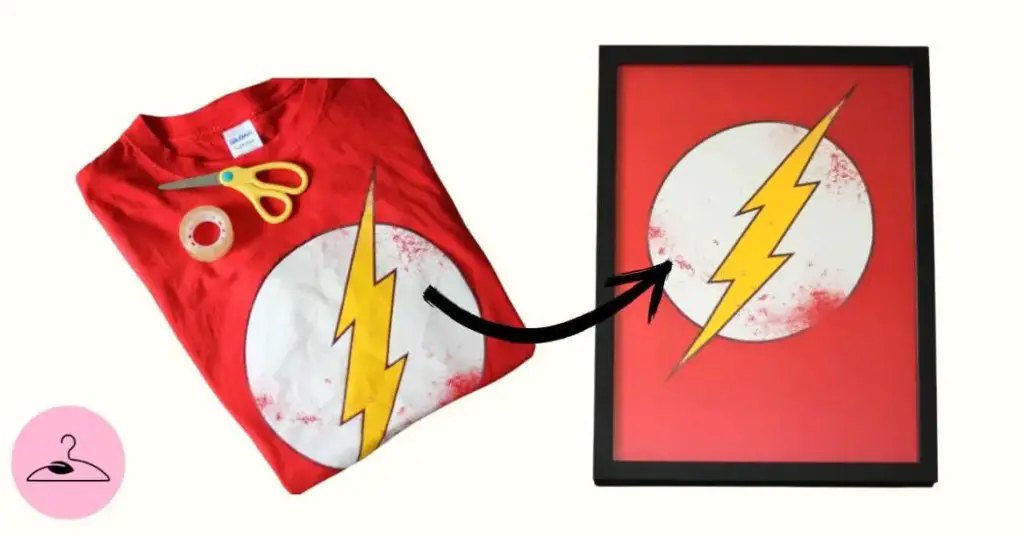
Idea #9. Frame Your T-Shirt
One of the simplest yet most visually impactful ways to repurpose a sentimental T-shirt is by framing it. If you have a shirt that holds a lot of personal meaning—maybe from a concert, sports team, or a specific chapter of your life — why not turn it into wall art?
You could create a statement wall with several framed shirts, organized by theme: a row of vintage band tees, sports jerseys, or even a timeline showing how your style has evolved over the years. This is a low-effort, beginner-friendly project that requires minimal tools but offers big emotional payoff.
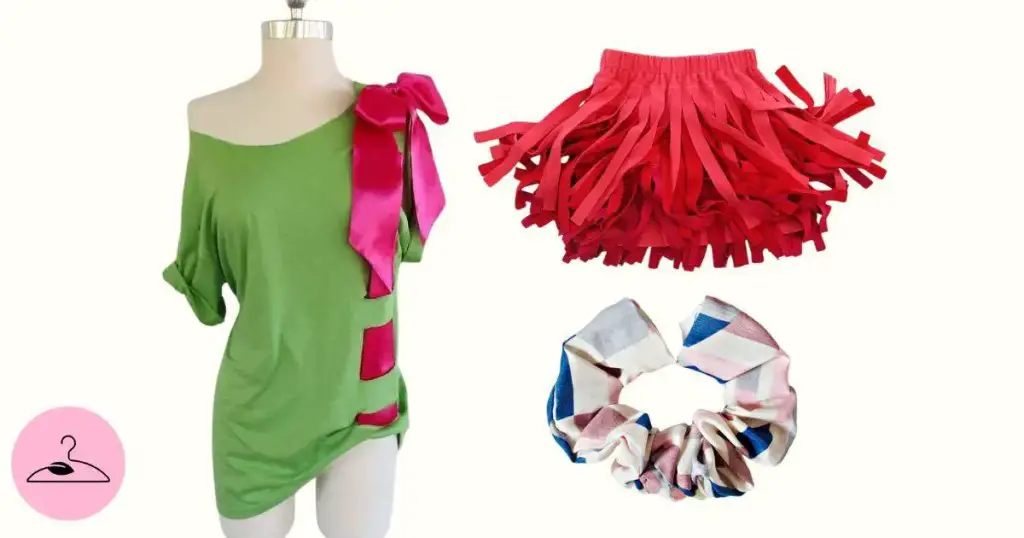
Idea #10. Upcycle The T-shirt in a Creative Way
As an interesting upcycling idea, cut your old sentimental T-shirt into a crop and add a lace-up back with ribbon, leather cord, or string for an edgy twist. Or, turn a shirt into a fringe skirt or shorts by cutting strips and tying them at the waist: mix in denim for extra flair. You can even make matching scrunchies or headbands for a cute accessory!
You don’t need to reinvent the wheel — plenty of tutorials and inspiration exist online. For example, check out @moeyslowfashion on TikTok, where you can learn how to add straps, hem the edges, or revamp sleeves. You’ll also find easy-to-follow guides to turn your tee into trendy pieces like halter tops, fairy-core camis, or even a two-piece set.

Frequently Asked Questions
Cut the t-shirt several inches above your waist, leaving enough fabric to hem the bottom. Always make sure to try on the cropped t-shirt and adjust the length as needed before hemming. You could also consider adding elastic, ribbons or other waistband elements for a more secure fit.
For most of these designs all you will need is: scissors, a needle and thread or sewing machine, pins or clips to hold the fabric in place, ruler/ measuring tape to ensure accuracy, chalk or pen to make small markings, any decorative elements like buttons, lace, ribbons, or extra fabric to mismatch it with your t-shirt.
Revive worn t-shirts by adding fun touches like buttons, sequins, or embroidery. You can also dye them to refresh faded colors or sew on a border for a clean finish. Small details go a long way in making nostalgic pieces feel fresh again.
Transform old t-shirts into trendy styles by following upcycling guides like @moeyslowfashion’s. She shares patterns for Y2K tops and creative hacks—like making a flowy tie-back top. It’s a fun way to stay stylish and sustainable using what you already own.
Yes! Turn old t-shirts into cushion covers, wall hangings, or fabric bunting. It’s a lovely way to preserve memories while adding a personal touch to your space. Choose shirts with standout prints or logos and mix them with neutral fabrics for a cozy, curated look.
For no-sew options, try cutting and knotting the fabric to create halter tops, fringed bags, or braided belts. Fabric glue or iron-on hem tape can also help secure edges. Perfect for low-effort creativity while preserving the sentimental value.
You can crop the t-shirt, turn it into a tank, or add rouching or ties while keeping the original print intact. Focus your changes around the design to highlight it. This way, you modernize the fit without losing the emotional value.